An important thing to know about dates and times in Power BI (and Excel PowerPivot) is that they are really just integers and decimals, respectively, behind the scenes. All dates and times in Power BI are relative to the same starting datetime value – 12/30/1899 at midnight. To demonstrate, here is a simple table in the query editor. The column of datetime values was duplicated and the data type changed to decimal. The zero value is 12/30/1899 at midnight and the other datetimes are relative to that.
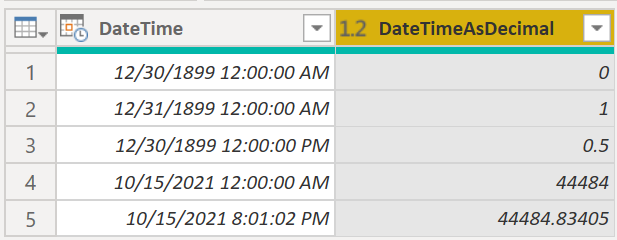
Another important thing to know is that, even when you format datetime values as just a date or just a time, the other component is always there behind the scenes. Date column values always have the time fixed at midnight and Time column values always have the date fixed at 12/30/1899. Also, while the query editor has a Duration data type, that column is converting to a decimal number (in days) when you load that table to your model.
When creating a DAX expression to calculate a duration (the time between two datetime values), you can simplify things by treating your datetime values like the integers/decimals they are. Hear are a few points on modelling and "measure"-ing times/durations.
- Split DateTime columns into Date and Time columns
Before calculating a result, we need to set up the model first. As with any model, delete any columns you will never need. If you don't care about dates, delete all those DateTime columns. If you don't need time analysis, convert all DateTime columns you do need into Date columns. This will significantly reduce file size and improve performance. If you do need time analyses, split your DateTime columns into separate Date and Time Columns. Usually, this can be done easily in the query editor by splitting the column on the space. Again, this will reduce file size and increase the flexibility of your model (e.g., you can have a Date table and a Time table (see video below) instead of a massive DateTime table).
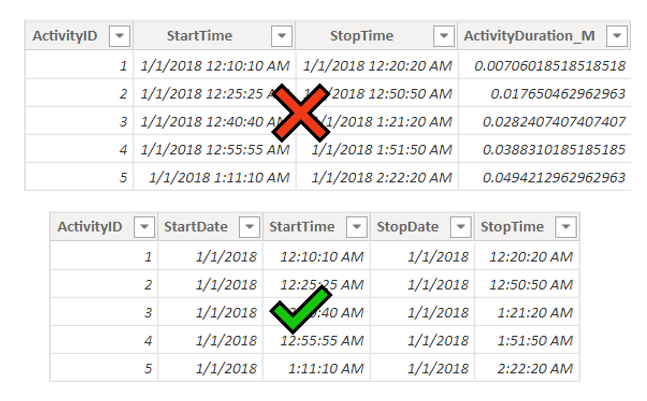
2. You don't need a Duration Column
Note that the recommended table above doesn't have a duration column. Instead of adding another column to your model in the query editor or with DAX, you can often calculate your duration with a simple measure. For example, a good way to calculate the total duration for the green-check table above is with an expression like this (see #4 for the FIXED part). Note that the parentheses are important to get the correct result (or you can just subtract the last term in the SUMX).
Total Duration =VAR rawresult =
SUMX (
Activity,
( Activity[StopDate] + Activity[StopTime] ) – ( Activity[StartDate] + Activity[StartTime] )
)
VAR result =
FIXED ( rawresult, 4 )
RETURN
result
3. Use INT() instead of DATEDIFF() for Days
For a long time (and sometimes still do), I would use expressions like this to find the number of days between two dates, where a date column syntax would be used in a calculated column and a date expression would be used in a measure.
DaysBetween = DATEDIFF(<date column or expression 1>, <date column or expression 2>, DAY)
Then I saw a post by Ed Hansberry that showed a significant performance improvement by using this instead.
DaysBetween = INT(<date column or expression 2> – <date column or expression 1>)
The INT function returns the integer portion of the difference of the two interger/decimal values behind the scenes.
4. Use FIXED() instead of DATEDIFF() for Times or DateTimes
Using the same approach as above, instead of using DATEDIFF(<datetime expression1>, <datetime expression2>, MINUTE) for example, use an expression like this.
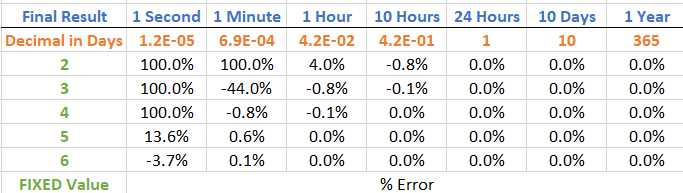
HoursBetween = 24 * FIXED( <datetime expression2> – <datetime expression1>, 4)
Use 24*60 for minutes or 24*60*60 for seconds, since the decimal returned from the FIXED part is in days. With the FIXED function, you need to specify the precision of the final result. Below is a simple table that shows the impact of that choice depending on your final result. As most total durations will be > 1 Hour, a value of 4 often works well.
5. Do your calculation first, then FORMAT it.
In the Power BI community, I've seen a few solutions for formatting a duration expression in which DATEDIFF(…, …, SECOND) is used to get the total seconds. From there, minutes, hours, and days are calculated in separate variables from that which are then concatenated together for the final result. A simpler expression is shown below. The variables dt1 and dt2 can be any datetime expression.
Duration Example =VAR dt1 =
MIN ( Table[DateTimeColumn] )
VAR dt2 =
MAX ( Table[DateTimeColumn] )
VAR rawresult = dt2 – dt1
VAR finalresult =
FORMAT ( INT ( rawresult ), "0:" ) & FORMAT ( rawresult, "hh:nn:ss" )
RETURN
finalresult
This expression returns values like "9:23:59:59" to show days, hours, minutes, and seconds. Below is a longer expression that has multiple option to choose from. Use just the one you need by uncommenting out the lines for the one you want (and delete or re-comment the others). Bonus tip – highlight multiple lines in the DAX formula bar and hit the Ctrl and / keys to quickly comment/uncomment the code.
Duration Options =VAR dt1 =
MIN ( Table[DateTimeColumn] )
VAR dt2 =
MAX ( Table[DateTimeColumn] )
VAR rawresult = dt2 – dt1 //just need these first 3 variables and any one of the ones below. Options for demo purposes only.
// VAR finalresult =
// INT ( rawresult ) //for just full days instead of DATEDIFF(dt1, dt2, DAY)
// VAR finalresult =
// ROUND ( rawresult, 0 ) //for rounded days
// VAR finalresult =
// FIXED ( rawresult, 3 ) //for days as decimal (choose needed precision) instead of DATEDIFF(dt1, dt2, SECOND) …
// VAR finalresult =
// FORMAT ( rawresult, "hh:nn:ss" ) //use only if result will be <24 hrs. No need to use CONVERT(rawresult, DATETIME) first.
VAR finalresult =
FORMAT ( INT ( rawresult ), "0:" ) & FORMAT ( rawresult, "hh:nn:ss" ) //use for duration of any length
// VAR finalresult =
// FORMAT ( INT ( rawresult * 24 ), "0:" )
// & FORMAT ( rawresult, "nn:ss" ) //for showing hours instead of days
RETURN
finalresult
To learn more, check out these two YouTube videos. The first discusses building a data model from a source that includes DateTime columns. The second discusses the content in this article.

Dear Pat,
I found on Power BI community your comment about the calculating duration based on time. The person who make a question was in search of average duration of sleeping hours.
I need the same thing, just without the average. For example:
Sleep time: 10:45pm
Wake-up time: 7:00am
How to calculate that a get the result: 8:15?
Thanks a lot in advance!
Aleksa
You can add 1 to the difference like this to get a result of 8:15.
Sleep Time = FORMAT(1 + TIME(7,0,0) – TIME(22,45,0), "hh:mm")
Dear Pat,
I need find the difference between two date/time columns as in days and problem here is i connected to the Microsoft Dataverse using 'Direct Query'. Please help how do i solve this.
hello Pat I am working with dashboard build where I am looking at particular window of time and i would like review records from another table to determine the amount of time that the records in the second table within the window of the first set of time periods of data
Dear Pat,
How can i calculate the difference time between 11:54:00 PM and 12:09:00 AM in power bi?